Using Custom Fields
Capture your unique testing data by storing it in custom fields.
TestMonitor offers default fields for each object, but your company or testing process might demand extra data. In order to keep track of the data you need, TestMonitor allows you to add custom fields. For example, you might want to assign due dates to your issues. You can easily do this by creating an additional date field for issues via the custom fields functionality. You can even decide whether the field is required or optional.
Custom fields can be created for requirements, risks, test cases, test runs, and issues. You can use these custom fields and their values to search and filter objects in your project as well, making organization easier.
Please note that you must have a Professional or Enterprise plan subscription to access this feature.
Custom Fields Overview
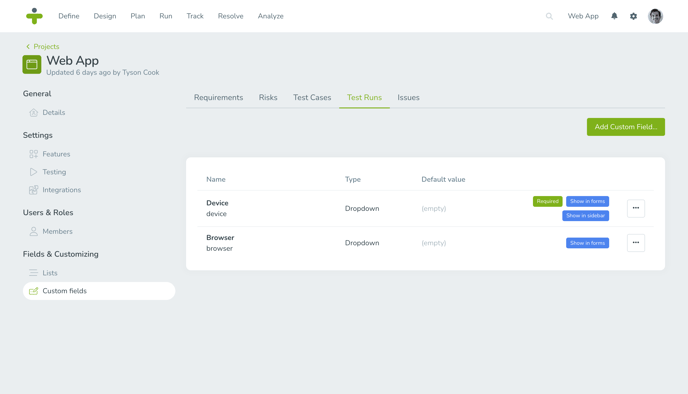
The custom fields overview provides a list of all of the custom fields you created for a project. The lists are broken out into tabs for requirements, risks, test cases, test runs, and issues. In each tab, you can view and manage custom fields for the named object.

Add a Custom Field
As custom fields are created for each individual project, you can access the custom fields overview by going to the project settings. When you want to add a new custom field, open the tab of the object you want to create the field for from the custom fields overview.

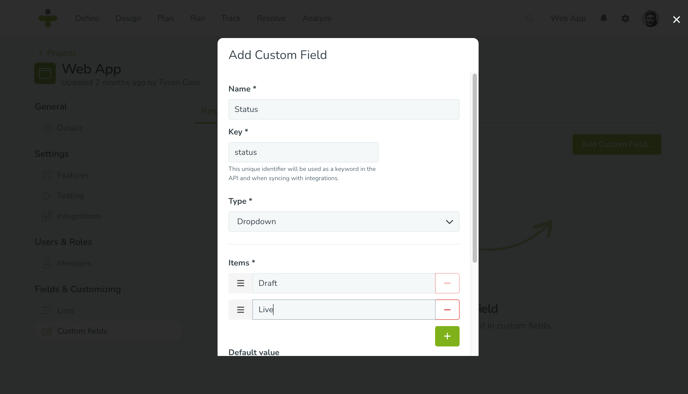
Click Add Custom Field and fill out the appropriate fields:
- Name: This is a required field for the title of the new custom field.
- Key: This is a unique identifier for you to use with API integrations. The key must start with a letter and can only contain letters, numbers, and underscores.
- Type: Use the dropdown to select what kind of data your custom field will store.
- Text: The field stores plain strings of text up to 100 characters long.
- Rich Text: With this field you can accept rich text content formatted using a WYSIWYG editor.
- Number: The field can store whole numerical values.
- Dropdown: This creates a list of dropdown options that a user can choose one value from.
- Multi-select: You can create a list of dropdown options that a user can select one or more values from.
- Checkbox: Creates a field that can be checked or unchecked, ideal for true/false or yes/no values.
- Date: Used to store dates. Users will have an inline calendar to select their dates.
- URL: Save URL's and display them as a clickable hyperlinks.
- User: The user field contains a list of your project members.
- Default: Optionally, set a default value for the custom field. This is available for all field types except User.
- Required: Toggle this switch to make the custom field required.
- Show in forms: Enable this if you want to see the custom field when creating an object.
- Show in sidebar: Toggle the switch to see the custom field in the test case, test run, or issue sidebar.
- Order: When you have multiple custom fields, you can determine the order in which they appear on the forms, detail pages and sidebars, by entering a number. The fields will be listed from lowest to highest number.
Select Create to save your new custom field.
If you choose not to show custom fields in forms or in the sidebar, you can still see and update them on the object’s detail page.
Use a Custom Field
After you’ve created a custom field for an object, it will be available to use directly. For example, if you created a custom field, such as a text, for test cases, you will now be able to add your additional text field when designing test cases. The value you entered for the custom field will be visible for the tester during test execution.
Where you can enter information for a custom field on an object depends on the settings you chose. Choosing to show a custom field in forms will enable you to fill the custom field when you are creating an object. Your settings will also determine if you are able to update it via the sidebar. The custom field will always be accessible via the detail page.
If you have any custom fields for your issues that are dropdowns, multi-selects, checkboxes, dates, or users, you can report on them using the issue summary.
Filter, Sort, and Search on Custom Fields
Different types of custom fields can help you filter, sort, and search for objects. We’ve listed them for you below:- Search: You can search by text, rich text and number custom fields.
- Filter: Limit your results by custom field dropdowns, multi-selects, checkboxes, dates and users.
- Sort: Organize your results based on text, number, dropdown, multi-select, checkbox, and date custom fields.
Import and Export Custom Fields
Custom field values can be imported and exported from TestMonitor. Here are some useful tips and guidelines:
- Import:
- When setting up your import, your mapping will automatically include your custom fields.
- Fields that are marked as "Required" need a value in your import file, otherwise the import will fail.
- The importer will validate your import values based on the custom field type, for example: a field with type "Number" will check the import content for being a numeric value.
- Export:
- The export for requirements, risks, test cases and issues will include the values for their respective defined custom fields.
- Rich-formatted text fields are converted to plain formatted fields in Excel files.
Report using Custom Fields
Your custom fields can be used to scope your reports or visualize their data using charts. Here's what available:
- Filters: The coverage / matrix reports, the issue summary and the task report provide custom field filters. You can scope your data using custom field dropdowns, multi-selects, checkboxes, dates and users.
- Charts: The issue summary report supports visualizing custom field dropdowns, checkboxes, dates and users.
Update a Custom Field
You can update a custom field for a project at any time.To edit a custom field:
- Navigate to the project settings.
- Open the object tab that contains the custom field you wish to update.
- Click the three dots next to the custom field and select Update.
- You can now update the custom field name, order, and if it shows in the forms and sidebar of an object.
The key, the type, and whether a custom field is required cannot be edited.
Delete a Custom Field
If you made a custom field by mistake or no longer need it, you can remove it from the project.To remove a custom field:
- Navigate to the project settings.
- Open the object tab that contains the custom field you wish to delete.
- Click the three dots next to the custom field you want removed and select Delete.
Deleting the custom field will also remove the values set for this field. This cannot be undone.