When people want to work together in TestMonitor, they will need a user account. You can easily create or invite users so they can access your TestMonitor environment. A user can be anyone that needs access to TestMonitor like a tester, a developer or an auditor.
Users can also be assigned to one or more teams. Often, teams are used for a specific function, department, supplier, or organization to help keep track of the group a user belongs to. Using teams will help you throughout your project as you can filter data based on it. For example, you may want to see if a particular department is on track and so filter test results or issues by that team.
User Overview
You can find the user overview by clicking the Settings icon in the top right navigation and selecting Users in the left menu. The overview page contains a list of all of the users in your environment with their names, email and teams.
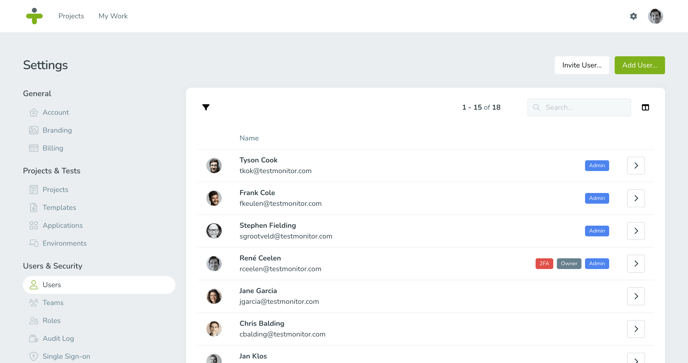
There are also some labels on the overview page that provide you with some quick information about the user account:
- You: This label indicates the user who is currently logged into the system.
- 2FA: This tag shows that the user has two-factor authentication enabled for their account.
- Admin: This tag denotes a user who has full access to the environment.
- Owner: This tag indicates the individual responsible for the ownership of the account, particularly in relation to technical and billing matters.
Use the filter icon to see users relevant to you. For example, you can filter based on a team to find users.
Create and Invite Users
TestMonitor gives you the option to manually add or to invite users to an environment. When you add a user, you will enter their profile information including a password, their assigned teams, and if they are an admin. When you invite a user, you only enter their name and email and select if they are an admin. The invited user will receive an email with a link that allows them to set their own password.
User accounts can also be created with auto provisioning when you have SSO enabled.
To add a user:
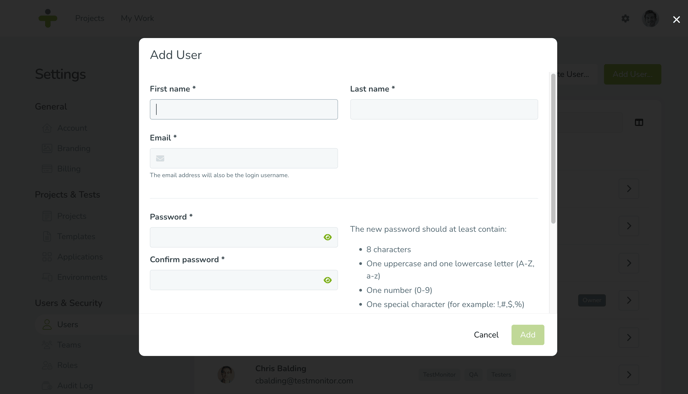
- Open the user overview page and click Add User in the top right. A popup will open with the following fields:
- First Name: Enter the user’s first name.
- Last Name: Enter the user’s surname.
- Email: Enter the user’s email address, this will be their login for TestMonitor.
- Password: Create a password for the new user that is at least 8 characters long, contains one upper and one lower case letter as well as one number and one special character. You will have to confirm the password to make sure there were no mistakes in entering it.
- Admin: Toggle the switch if the new user should be given administrative rights, which means they can access the settings.
- Teams: Select any teams you want the user to be a part of for later sorting purposes.
- Click Add
Admin users have full access to the account, which includes user management, project management, audit logging, single sign-on, and subscription & billing.
Please consider carefully before granting admin privileges.
To invite a user:
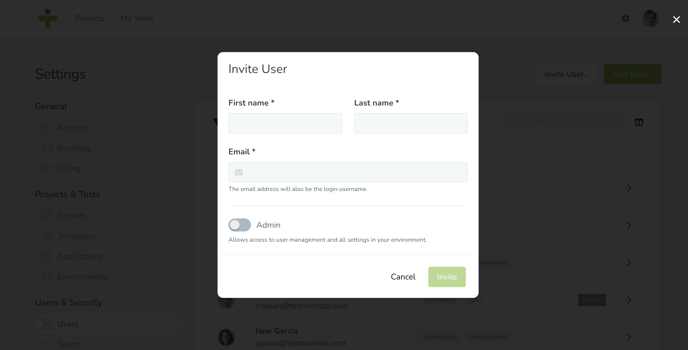
- Open the user overview page and click Invite User in the top right. A popup will let you enter the following fields:
- First Name: Enter the user’s first name.
- Last Name: Enter the user’s surname.
- Email: Enter the user’s email address, this will be their login for TestMonitor.
- Admin: Toggle the switch if the new user should be given administrative rights, which means they can access the settings.
- Click Invite.
- The user will receive an email with a link so they can complete their account by setting a password.
If you reached the limit of user accounts for your environment the add and invite options won’t be available on the overview page.
Update User Information
To update basic user information, click the arrow next to a user on the user overview page. This opens the user detail page.
The First Name, Last Name, and Email fields can be edited by hovering over them and clicking the pencil icon that appears. Click to save any of the updated information.
When you edit a user you can also set an avatar for that user.
Archive and Delete Users
If you created a user by accident, you can easily delete them:- Open the user detail page.
- Click the three dots in the top right corner and select Delete.
You won’t be able to delete users that are tied to actions in your projects. This would cause problems with test results and other data in the project a user might be tied in. If a user has already been active in the environment, you will need to archive them instead of deleting them.
- Open the user detail page.
- Click the three dots in the top right corner and select Archive.
Users can’t be unarchived. Instead you can use the same email address to add someone as a brand new user.
Assign Users to Teams
Once you have users, you can manage them in teams. Click the Settings icon in the top right navigation and select Teams in the left menu to see the teams overview page. The teams overview page will let you view and manage teams in your environment.To add users to a team:
- On the teams overview page, click the arrow for the team you want, opening the team detail page.
- Click Add Members in the top right.
- Search and add users to your team.
- Click Add
If you add a user by accident, click the three dots next to the user on the team details page and select Delete to remove them from the team.
Add and Update Teams
If you don’t see the team you want on the overview page, you may need to create a new one. To create a new team:- On the teams overview page, click Add Team in the top right.
- Fill in the fields in the popup window:
- Name: This is a required field and will be the title of the team you can later use for searching and filtering.
- Description: This is an optional field where you can briefly describe the team.
- Click Add.
Having the right teams with the correct users assigned can help you later filter data in your projects. For example, you can filter by teams for test runs assigned in the test workload report to find out which teams have the highest workload.
- On the teams overview page, click the arrow for the team you want to update, opening the team detail page.
- You can hover over the Name and Description field until a pencil icon appears to edit the fields.
Delete and Restore Teams
If you created a team by accident or no longer need it for your projects and reporting, you can delete the team. To delete an individual team:- On the teams overview page, click the arrow for the team you want to update, opening the team detail page.
- Click the three dots in the top right corner and select Delete.
It’s possible to delete multiple teams at once. To delete multiple teams, open the teams overview and hover over a team. Click the checkbox to the left of the team name and select all the teams you want to delete. When you have selected all the teams, click Selected and choose Delete.
Sometimes you might delete a team by accident. Deleted teams can be recovered using the Restore teams option on the teams overview page. Click on the three dots in the top right corner, select Restore teams and then click the arrow to restore a team.
When you restore a team, all assigned users will be reassigned to the team automatically.