Webhooks are a powerful mechanism used to integrate web applications and services in real-time. They provide a way for developers to receive automatic notifications or data updates from other applications or platforms. Webhooks are commonly used in various scenarios such as triggering events, synchronizing data, and enabling seamless communication between different systems.
This article will guide you through the process of working with webhooks. We will cover everything from adding and testing a webhook to updating and deleting it when necessary.
Before You Begin
Before adding a webhook, ensure you have the following requirements in place:
-
Web Application or Service: You should have a functioning web application or service where you want to receive webhook notifications. This could be a website, API, or any other web-based system capable of handling incoming HTTP requests.
-
Endpoint URL: Decide on the URL or route within your application that will act as the webhook endpoint. This endpoint should be accessible and capable of receiving incoming HTTP POST requests.
-
Security Considerations: Consider the security aspects of implementing webhooks. We only allow secure connections (HTTPS). You're encouraged to utilize the signature verification method to validate the authenticity of incoming requests.
Adding a Webhook
Go to the Project Settings of the project you wish to set up an webhook with.
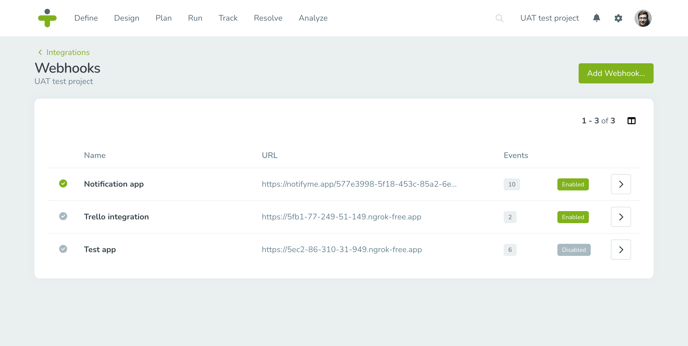
Once you have opened the project settings page:
- Head over to the Integrations section and click the Configure button for Webhooks.
- Click on Add Webhook on the top right. A popup will open with the following fields:
- Name: This will help you identify your webhook.
- Events: Select one or more events which should trigger the webhook.
- URL: The URL endpoint of your web application or service that will handle the incoming webhook calls from TestMonitor.
- Secret: Setting a webhook secret allows you to ensure that requests sent to the payload URL. Learn more about securing your webhooks.
- Enabled: Toggle the webhook state. Disabled webhooks will refrain from sending HTTP requests.
Click Add in order to create the webhook and to return to the webhooks overview page.
Each project can have up to 5 active webhooks.
Handling a webhook call
When working with webhook calls, it's essential to handle them effectively to ensure reliable data transmission and proper integration.
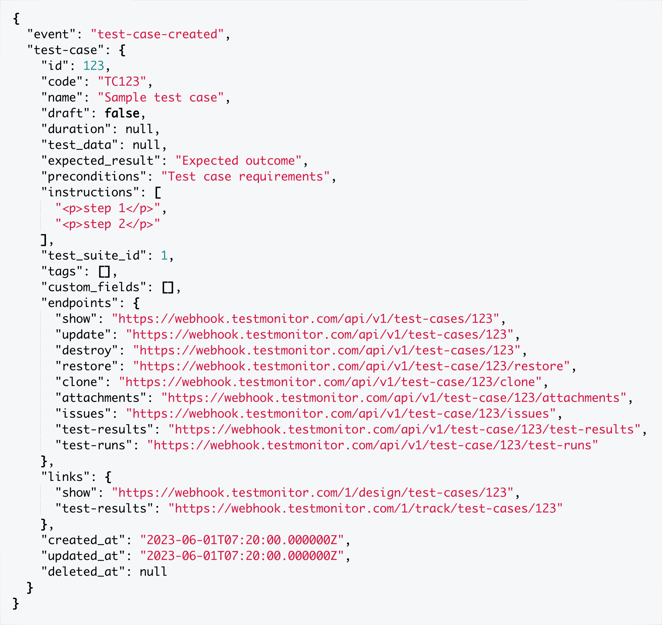
Each payload includes the event name (trigger) and the subject related to the event. Here's an example of a webhook payload:
Below are some additional pointers and insights on how TestMonitor handles webhook calls:
-
HTTP method: Webhook calls are made using the HTTP POST method. Ensure that your webhook endpoint is configured to handle incoming POST requests.
-
Payload format: Payloads are transmitted in the JSON (JavaScript Object Notation) format using the application/json content type. Make sure your webhook handler can parse and process JSON data effectively.
-
Retry mechanism: Webhook calls may occasionally fail due to network issues or temporary disruptions. The retry mechanism will handle such situations: 3 attempts will be made before the webhook is automatically disabled. We'll use increasing intervals to compensate for short moments of downtime (1, 10, 100 seconds). You'll receive a notification when a webhook is disabled because of 3 failed attempts.
-
Error handling and logging: Implement robust error handling mechanisms in your webhook handler code. Capture and log any errors that occur during the processing of a webhook call. This will help you identify and troubleshoot issues effectively. Consider using logging frameworks or tools to centralize and manage error logs efficiently.
-
Response status code: Provide a response with an appropriate HTTP status code to acknowledge the successful processing of the webhook call. A common choice is to respond with a 200 OK status code. However, be cautious not to send unnecessary response bodies or introduce processing delays that may impact the webhook provider's performance.
-
Error responses: In case of errors during webhook processing, send an appropriate error response. The error will be displayed in the webhook log. Logs will be retained for a period of 14 days.
By following these tips and handling webhook calls effectively, you can ensure the smooth integration of webhooks into your application. Once you've build your application, it's important to test its functionality.
Data imports in TestMonitor are excluded from webhook calls. This prevents a bulk record import from generating thousands of webhook requests for your application to handle.
Testing the Webhook
Testing a webhook helps ensure that it's properly configured and functions as expected. Follow these steps to test your webhook:
-
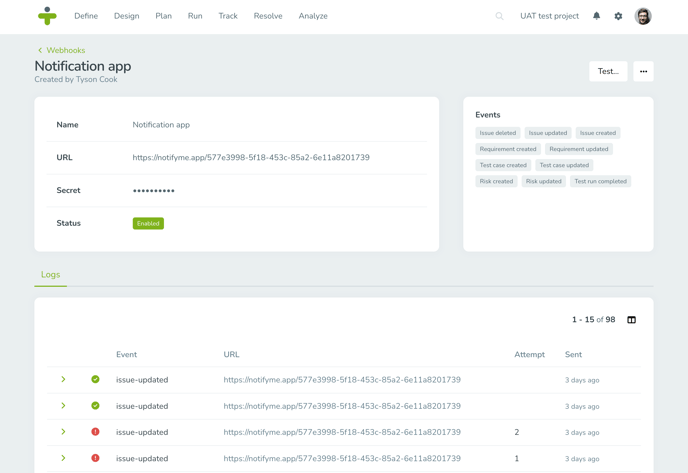
In the webhook overview, open the detail page of the webhook you want to test by clicking on the webhook name or the arrow on the right.
- Click on the Test button in the upper right corner. A popup will appear confirming your test request.
- Click on Test to start your test. It can take several seconds for the test to complete. Refresh the page to reveal the latest log entries.
- The test outcome will be displayed in the webhook log. Test attempts will be marked using "test-event" as event name. Successful attempts will be indicated by a green checkmark in the log entry.
When your test has failed, you can expand the log entry by clicking on the arrow on the left. The request and its response will be shown, allowing you determine the cause of the failure.
Securing your webhook
Securing your webhook is crucial to ensure the integrity and authenticity of incoming requests. One common method of securing webhooks is by implementing signature verification.
To handle signature verification, follow these steps:
- Specify a secret for your webhook. This will be used to sign every webhook call. Keep this key securely stored and avoid exposing it in public code repositories or configurations.
- Extract the signature of the webhook call. Each call request will include a custom header named Signature, containing the generated signature.
-
Verify the signature of the incoming request. The signature is generated based on a HMAC hash. Use the shared secret key to regenerate the signature using the same algorithm and parameters. The signature is based Compare the regenerated signature with the received signature to validate the authenticity of the request. If the signatures match, proceed with processing the webhook payload. Otherwise, consider the request invalid and reject it.
Signatures are encrypted using a HMAC SHA256 message authentication code.
Implementing signature verification adds an extra layer of security to your webhook integration, ensuring that only valid and unaltered requests are processed. It helps prevent unauthorized access, data tampering, and potential security breaches.
Updating a Webhook
There might be situations where you need to update a webhook, such as modifying the endpoint URL or updating the event triggering the webhook. You can easily update a webhook with the steps below:
- In the webhook overview, open the detail page of the webhook you want to test by clicking on the webhook name or the arrow on the right.
- Hover over a field and click the pencil edit icon. Save any changes made to a field.
Disabling a webhook (temporarily) will cause it to stop triggering, allowing you to fix any issues or preserve its data without deleting it:
- Click on the three dots in the top right corner.
- Select Disable. After confirming your action, the webhook will stop triggering.
You can re-enable the webhook at anytime:
- Click on the three dots in the top right corner.
- Select Enable. After confirming your action, the webhook resume triggering.
Delete a Webhook
To delete an individual webhook:
- On the webhook overview page, click in the name column or right arrow button to open up the individual webhook.
- Click on the three dots in the top right corner and select Delete.
Deleting a webhook will delete all log entries as well. This action is not reversible! If you want to (temporary) preserve your data, consider disabling the webhook.