A test case defines which actions must be performed in order to verify whether a specific function or functionality meets the expected result. On this page, you’ll learn more about the benefits of using test cases, and how to use them in TestMonitor.
A test case contains a sequence of steps for a tester to follow and may even have the expected outcome a tester should end up with. Test cases are an organized way to validate if software is free of bugs and working as required. By making clear and concise test cases, you have a reusable set of testing parameters to make sure your software is working correctly and an organized way to track test results.
Test Cases Overview
The test cases page shows a list of test cases in your project. Click Design in the navigation menu to open the test cases overview.

Add a Test Case
In order to add a new test case, click the Add Test Case button in the top right corner. A popup will appear where you can fill out the various fields of the test case you’re creating.- Name: Choose something to the point that will summarize the test case.
- Duration: This is an optional field where you can enter the estimated time it will take to execute the test case.
- Instructions: This area allows you to add step-by-step directions on how to run the test case.
- You can add as many steps as needed with the plus icon to the right and remove any steps with the minus sign.
- You can utilize rich text formatting for each step in the instructions (bold, italic).
- Steps can be reordered by clicking the three horizontal lines and dragging it up or down.
- You can copy and paste an entire set of bulleted or numbered directions into the instruction field and each point will automatically split into separate steps.

If you have defined custom fields for test cases, they will show up here when the Show on Form option is enabled. You can manage your custom fields for test cases in the Custom fields section in the project settings.
Some test cases may be more involved than others and require more information to successfully run them. Below the instruction field, you will see a + More option that will reveal further fields.
- Preconditions: Additional information about what has to be done before the test case can begin. This field allows for basic rich text formatting. If you highlight some text in this field, you will have the option to format text with bold, underline, italics and strikethrough. There are additional options to create lists, quotations, and hyperlinks in the field.
- Expected result: This space is to detail what the result or output of a test case should be. This lets a tester know if their result is unexpected and signals a bug or issue with the program. Highlighting text in this field will open a menu with advanced text formatting options.
- Test data: Any relevant information a tester may need to run a test case can be added here. Highlighting text in this field will open a menu with advanced text formatting options.
- Tags: You can add one or more tags to a test case by clicking the dropdown. Tags help to organize and sort test cases.
- Draft: Toggle the switch in order to move a test case from a pending draft to a test case that can be scheduled and assigned. If you have not finished creating your test case or are not ready for it to be assigned, leave it as a draft.
If you for example migrate from another system, you might have test cases in an Excel or CSV file. You can then choose to import the test cases.
Relate Requirements, Risks and Applications
When creating a test case, there is a + More option with fields to assign requirements, risks and applications to the case. This makes test cases visible on the details pages of the other features for easy reference. Assigning these other fields to test cases also allows you to filter test results, linked issues and project reports later on to help keep you organized.
If you don’t see the option to add requirements, risks or applications, the features may not be enabled. You can enable these features in project settings.
- Requirements: Click to see a dropdown of all of the requirements for your project. You can select multiple requirements to associate a test case with. You can remove a requirement by hitting the cross next to the requirement name.
- Risks: Click to see a dropdown of all of the risks for your project. You can select multiple risks to associate a test case with. You can remove a risk by hitting the cross next to the risk name.
- Applications: The application dropdown allows you to associate an application needed for the test case. You can remove an application by hitting the cross next to the application name. You can add additional applications as your project expands.
You can relate and remove requirements, risks and applications from multiple test cases at once using multi-select.
Reorder Test Cases
When managing multiple test cases, it may be necessary to adjust their order for better clarity and organization, such as following a logical sequence like CRUD (Create, Read, Update, Delete). To rearrange the order of a test case:
- Position your cursor over the drag handle located to the left of the test case code.
- Click and hold to drag the test case, dropping it in the desired order. A grey line will appear to indicate where the test case will be placed.
- Once dropped, the new order will be saved automatically.
When planning a test run, you have the flexibility to rearrange test cases as needed for that particular run. It's important to note that changing the order of test cases will not impact the overall sequence of the test run.
Reordering is not available when sorting is used or a search is in progress.
Update a Test Case
Updating information for a test case can be done through both the detail page and the sidebar view of the test case. In both views, you will have the basic test case fields as well as tabs for requirements, risks and applications where you can also update them!To see the sidebar view of a test case, click anywhere in the test case row and a panel with the test cases information will popup on the right. To see the detail page, click on the code or right arrow and a new window will open with the test case information. Updating the information is simple:
- Hover over a field and click the pencil edit icon.
- Click the save icon by each field to save any changes made.
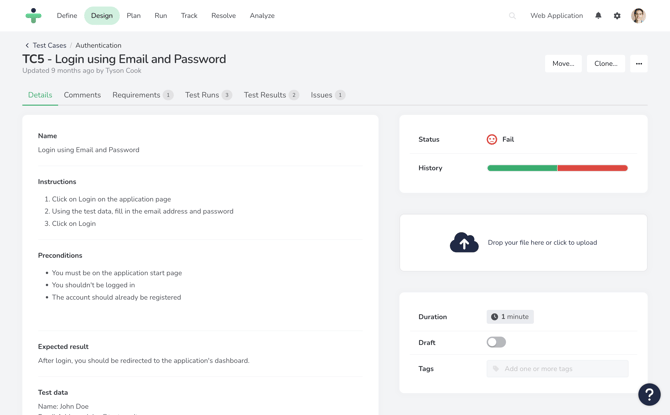
The test case status indicates the overall result, based on the latest test run performed for that specific case.
Updating a test case also provides a new field where you can drop or upload a file. These attachments will be shown when running a test and keep helpful information in one place. For example, add the expected output as an attachment, and the tester can compare this document side by side with the one that’s generated while running the test. Attachments can also be useful when you have to compare documents, such as invoices.
TestMonitor supports uploading files up to 50 MB in size.
Comment on Test Cases
You can add comments on a test case to create a discussion between your test designers and keep all the test case information centralized. You can use mentions to address comments to specific users and bring them into an test design discussion.
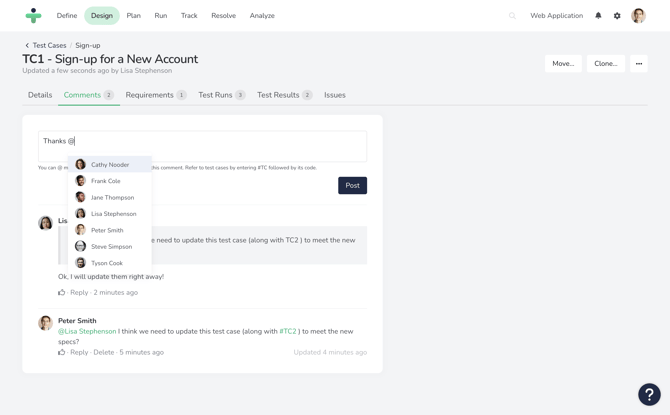
You can also refer to other test cases by using the hashtag and entering the code or (part of) the name or description of the test case you want to refer to.
To view and add comments for a test case in the sidebar, open the Comments submenu.
To view and add comments for a test case in the details page, simply scroll down to the Comments submenu (which is the default selection).
Clone a Test Case
If you need another copy of a test case, you do not have to manually create a duplicate of all of the information and links. TestMonitor provides an easy way to clone a test case and all of its associated information.If you are on the overview page for test cases:
- Click the three dots in the row for the test case you want to duplicate and select Clone.
- A popup will give you the option to name the duplicate test case.
- The newly cloned test case will appear at the bottom of the overview page.
If you are on a test case detail page:
- Click Clone in the top right of the page.
- A popup will give you the option to name the duplicate test case.
- The newly cloned test case will appear at the bottom of the overview page.
Organizing Test Cases into Folders
Folders are used to group and organize test cases into logical categories. You can create as many folders as you need and nest them to build a structure that matches your workflow.
Test cases can either belong to a specific folder or stay in the Home (root) folder. This allows you to handle general test cases and specific categories with ease.
You can manage your folders by utilizing the folder tree displayed on the left side of the interface. To view the folder tree, simply click the right-arrow button labeled "Show navigation" If you wish to minimize this view, you can do so by clicking the left-arrow button labeled "Hide navigation."
You can adjust the size of the left panel by dragging the divider in the center to the left or right, allowing you to allocate more space for either your folders or the test case overview as needed.
Add, Update, Delete and Restore Folders
Creating a new root folder is a straightforward:
- Move your mouse cursor to the Home folder
- Click on the plus icon on the right. A popup will appear where you can fill out the name of the folder and optionally, a description.
- Click Add to confirm.
To update a folder, follow these steps:
- Navigate your mouse cursor to the folder you wish to update.
- Click on the three-dotted icon on the right. A context menu will appear.
- Select Edit.... A popup will appear where you can change the name or the description of the folder.
- Click Update to confirm.
To delete a folder, follow these steps:
- Navigate your mouse cursor to the folder you wish to delete.
- Click on the three-dotted icon on the right. A context menu will appear.
- Select Delete.... . A confirmation dialog will appear.
- Click Delete to confirm.
And to restore a deleted folder, please follow these instructions:
- Navigate your mouse cursor to the Home folder.
- Click on the three-dotted icon on the right. A context menu will appear.
- Enable the Show deleted folders checkbox. Deleted folders will be displayed within the folder as items that are greyed-out.
- Identify the folder you wish to restore and hover your mouse cursor over it.
- Click on the three-dotted icon on the right. A context menu will appear.
- Select Restore... . A confirmation dialog will appear.
- Click Restore to confirm.
When you delete a folder, all subfolders and associated test cases will also be removed. This action will disconnect the affected test cases from their corresponding test runs, and the results of those test runs will be updated to reflect these changes.
Organizing and Nesting Folders
After creating folders, you have the flexibility to reorganize them according to your preferences. To do this, simply utilize the drag-and-drop feature to reposition them as needed.

Additionally, you have the option to create subfolders, which are folders that reside within another folder. To create a subfolder:
- Move your cursor over the folder where you intend to create a subfolder.
- Click on the three-dotted icon on the right. A context menu will appear.
- Select New folder.... A popup will appear where you can fill out the name of the folder and optionally, a description.
- Click Add to confirm.
Additionally, you have the capability to organize an existing folder as a subfolder within another folder:
- Move your cursor over the folder that you wish to nest beneath another folder.
- Drag and drop the folder onto the parent folder, ensuring that the dragged folder is positioned slightly indented below the other folder.
You have the capability to create nested folders extending up to five levels deep.
Cloning Folders
Creating a duplicate of a folder provides a convenient way to replicate an entire folder, including its subfolders and associated test cases:
- Navigate your mouse cursor to the folder you wish to duplicate.
- Click on the three-dotted icon on the right. A context menu will appear.
- Select Clone.... . A popup will appear where you can enter the desired new name.
- Select the option to Include subfolders if you wish to replicate any folders contained within the selected folder. Check the Include test cases option to also create duplicates of the associated test cases.
- Click Clone to confirm.
Depending on the size of the folder and its contents, the duplication process may take some time to complete. To verify that all content has been successfully duplicated, you can refresh the page.
Move Test Cases to Folders
You have the ability to reorganize your test cases by moving them across different folders, enhancing the overall structure of your test case management. There are multiple methods available for relocating one or more test cases.
To move a single test case:
- Click the three dots in the row for the test case you want to duplicate and select Move.
- A pop will display the project's folder structure. Select the desired destination folder.
- Click Move to confirm.
To move multiple test cases:
- On the test case overview page, check the box that appears to the left of the row. Repeat this for every test case that you want to move.
- Click the Move... button in the toolbar.
- A pop will display the project's folder structure. Select the desired destination folder.
- Click Move to confirm.
Depending on the size of the selection, the move process may take some time to complete. To verify that all content has been successfully duplicated, you can refresh the page.
Delete and Restore Test Cases
To delete an individual test case:- Open a test case detail page and click the three dots in the top right corner.
- Choose Delete and confirm you want to delete this test case.
When a test case is deleted all related test results will be deleted. Test cases will also be disconnected from their related test runs and the status of those test runs will be affected.
- Click the three dots in the top right corner of the test case overview page, and then click on Restore test cases. A list of all trashed test cases displays.
- Locate the test case you want to restore and click the arrow button.
- Click Restore in the confirmation box and the restored test case now displays on the overview page again.

When a test case is restored, the link with related test results will be restored along with the link to test runs.
Batch Update Test Cases
Using multi-select, you can quickly edit or update several test cases at once:- Check the box on the left of the test case you want to select as part of your batch update.
- Select additional test cases, as required. To select all, check the box in the table header.
- Click the selected button in the toolbar:
-
- When you select Update, a pop-up box displays. In this section you can add, change, or remove the Requirements, Risks, and Applications of a test case. You can also set or update the test case duration or change its draft state.
- When you click Delete all the selected test cases will be deleted.
If you update the requirements, risks or applications for a test case it will overwrite the ones that are already assigned. For example, if requirement A is already assigned and you use the batch update to assign requirement B, the link to requirement A will be replaced by B. If you want both A and B to be linked you will need to select both via the batch update.