Applications
Create Applications to trace how they relate to your project results and to support your issue and release management.
Applications can be related to test cases, enabling you to filter your test cases and their results based on the applications.
To get even more detailed, in issues, you can specify in which version an issue occurred and when it will be fixed. With all of this information you can trace which issues are found in a specific version and which issues need to be fixed in a specific version. This allows you to properly organize your problem-solving and streamline your release management.
Before you begin
Make sure your project has the application feature enabled in order to link applications to test cases. In order to use affects and fixed version for issue management, make sure you have the issues feature enabled and create versions accordingly.
Applications Overview
You can see all applications in your environment by clicking the Settings icon in the top right navigation menu and selecting Applications in the left menu. In the overview is a list of all applications as well as the number of versions for each application.

Add and Update Applications
To add an application:- Open up the application overview page in Settings.
- Click Add Application in the top right.
- Enter a Name that identifies the new application and a Description if applicable.
- Select Add.
- Click the right arrow of an application to open the applications details page.
- Edit the Name or Description by hovering your mouse over the field and selecting the pencil icon.
- Click the Save icon to keep any changes.
Use Application Versions
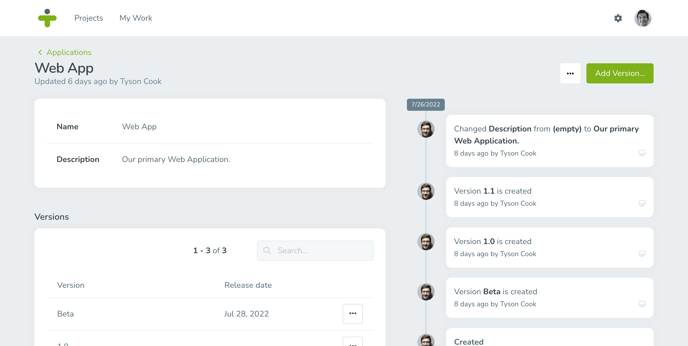
On the application detail page, you can add versions. Versions allow you to bring your issue management to a higher level as you can identify your issues based on the application version they are found in and can even assign them the version they will be fixed in.

By using fixed application versions you’ll also be able to benefit from the integrated changelog report in TestMonitor.
- Open the application detail page.
- In the Versions section, click Add Version and fill out the following fields:
- Number: This is a required field to identify the version number for the application.
- Release date: This is an optional field that records the release date of the version.
You can update an application version by hovering over the version fields and clicking the pencil icon. You can remove an application version by clicking the three dots to the right of a version row and selecting Delete. When deleted, if the version was assigned as an affects or fixed version for any issues, it will be removed.
Delete an Application
Applications can always be deleted, even if they are linked to test cases in a project. To delete an application:- Click the right arrow of an application to open the details page.
- Select the three dots in the top right corner and click Delete.
An application can be used in different projects, so make sure that they are not relevant to any of the projects in your environment before deleting.
- Check the box that appears in front of the application's name to select the application as part of your update batch.
- Select additional applications, as required. To select all, check the box in the table header.
- Click the selected button in the toolbar and click Delete.
Restore Applications
If you delete an application by accident, you can restore the data with the steps below.- Click the three dots in the top right corner of the application overview page, and then click on Restore applications. A list of trashed applications will display.
- Locate the item you want to restore and click the arrow button.
- Click Restore in the confirmation box and the restored application now displays on the overview page again.
Related Test Cases
When you are creating test cases for a project, you can select one or more applications to link to the test case. If you do not see the application needed for a test case in the dropdown, you can use the steps above to add a new application (or request an admin user to create a new one).