Test runs contain a set of test cases to be tested by one or more testers in a specific timeframe. Test runs allow you to assign individual test cases to testers who will be able to execute them. Test runs let testers know the tests they need to perform as well as the order and time tests have to be finished within. This feature is essential for planning your tests as well as monitoring its’ progress.
Each test run is part of a milestone that provides a range of time for all work to be completed in, perfect for sprints, new project releases, or updates. The test runs can be assigned to different testers to prepare the workload for the testers and avoid questions of who is in charge of testing what cases.
Before You Begin
Make sure you've created one or more milestones before you proceed.
Test Runs Overview
Test runs are created as part of a milestone. Click Plan in the navigation menu and then select the milestone name or right arrow button to see the list of related test runs.
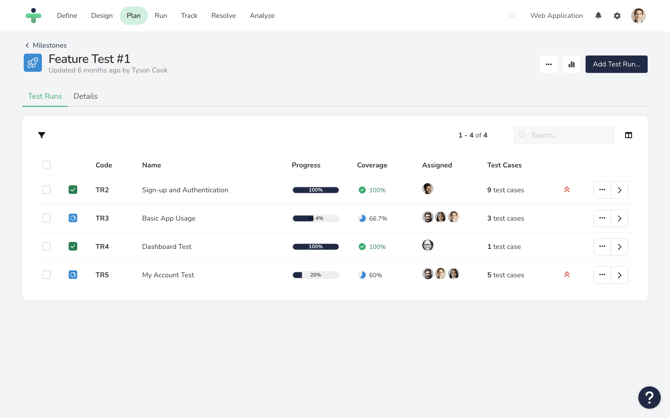
You can use filtering and column adjustments to see the test runs most relevant to you on the overview page. Some helpful filters might be:
- State: This allows you to view test runs based on their current lifecycle state, such as upcoming, in progress, or closed.
- Status: Enables you to filter and review test runs based on their (preliminary) result.
- Priority: This allows you to view test runs that are marked as "High priority".
The test run status reflects the overall result of the run, determined by the most critical result recorded among its assigned test cases.
State of a Test Run
In TestMonitor, test runs go through a carefully designed lifecycle, progressing from the initial planning phase in 'Draft' status to wrapping up test execution using the 'Closed' status. As testing evolves, these seven distinct states indicate the current status of each test run:
- Draft: Test runs in the "Draft" state are in the planning phase. They can be set up without triggering notifications to testers, allowing you to prepare thoroughly before activating them for testing.
- Upcoming: In the "Upcoming" state, test runs are planned for a specific date and time. They are waiting to start, and testers will be notified according to the scheduled start time.
- Open: Test runs marked as "Open" are currently active and open for testing. Testers can execute test cases and provide feedback during this phase.
- In Progress: Once test results are recorded for a specific test run, its state becomes "In Progress".
- Completed: When all testing activities are completed, test runs transition to the "Completed" state. Testers can still submit and update results.
- Expired: Test runs in the "Expired" state have passed their specified end date and time. Testers are no longer able to participate or submit results for these runs.
- Closed: The "Closed" state marks the end of a test run. Testers cannot run tests or submit results for closed test runs. It provides a clear distinction between active and completed testing efforts.
Each state is depicted by a status icon that will show up in each test run overview.
Add a Test Run
Test runs are created as part of a milestone. In order to create a new test run, first open the milestone and then click the Add Test Run button in the top right corner. A wizard will appear with the required and optional fields for the new test run. There are four steps in creating a new test run: Details, Test Cases, Users and Options.
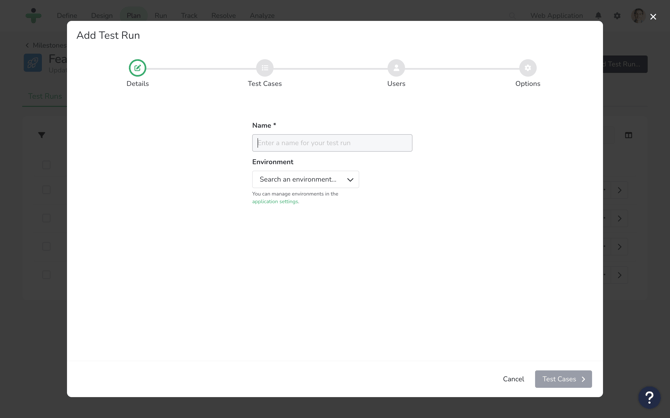
Step One: Details
- Name: Choose something that easily summarizes the tests you plan to run. This is a required field.
- Environment: Click to see a dropdown of all the environments for your project. This is an optional field for if you are testing in different test environments, browsers or operating systems. If you do not see the environment you need, create a new environment to be added to the dropdown.
If you have defined custom fields for test runs, they will show up here when the Show on Form option is enabled. You can manage your custom fields for test runs in the Custom fields section in the project settings.
When you have finished with the details step, click the green Test Cases button to go to the next step.
Step Two: Test Cases
The test cases step allows you to assign the test cases to a test run. The test cases from your entire project will be available to select from so you may want to filter the test cases to locate the ones you want.
- Folders: Use the folder tree to navigate through your set of test cases. To review the complete collection for your project, select the "All" option.
- Filter Test Cases: To filter test cases, click the filter icon in the top left. Use the dropdowns to select the Requirements, Risks, Applications or Tags you want to filter by.
If you do not see all of the filter options, click the gear icon in the top right and select More filters. You’ll then have the option to check which filters you want to be able to utilize.
- Add Test Cases to a Test Run: Once you have located your desired test cases, you have to actually add them to your test run. The default shows 5 test cases per page in the wizard, you can adjust this however to 15, 25, 50 or 100 if you want to assign a larger batch of test cases.
- To add an individual test case, click the plus icon to the right.
- To add all of the displayed test cases to a test run, click the list icon in the header of the test case list.
- Test cases can easily be removed from a test run by clicking the cross to the right.§1
- Order Test Cases in a Test Run: Sometimes test cases need to be run in a specific order. Once you have added test cases to a test run, click the three horizontal lines to the left of a test case and drag the test case up or down in the list to change its order position.
When you have finished with the Test Case step, click the green Users button to go to the final step.
Step Three: Users
The users step allows you to assign the tester in charge of executing a test run. To add an individual user, click the plus icon to the right. To add all of the displayed users to a test run, click the list icon in the header of the user list.
Step Four: Options
The options step provides some additional configuration options that are available for your test run:
- Draft: Toggle the switch to have the test run marked as draft. Draft test runs are useful for preparing and organizing your testing scenarios before execution, allowing you to refine your test planning without triggering notifications or executions.
- Period: The test run start- and end date fields establish the period the test run is available for testers to run. You can either pick a start date, an end date, or both. Click on either field to open the calendar and select both a date and time. Remember to consider the milestones end date when selecting this period.
- Priority: Toggle the switch to have the test run marked as a high priority with a red exclamation mark. Priority test runs should be done first when testing.
- Subscribers: Select one or more users to keep them informed about this run. They will receive a notification once the run has been completed. This is particularly useful for dependent test runs, where a tester of another test run can only start once this one is finished.
When you have finished with the options step, click Add to create the new test run.
Update a Test Run
You can update a test run in both the sidebar view of the test run and on the detail page. In both views, you can update the basic fields, test cases and users of the test run.
To see the sidebar view of a test run, click anywhere in the test run row and a panel with the test run information will popup on the right. To see the detail page for a test run, click on the code or right arrow and a new page will open with the test run information. To update the information:
- Hover over a field and click the pencil edit icon.
- Click the save icon by each field to keep the changes made.
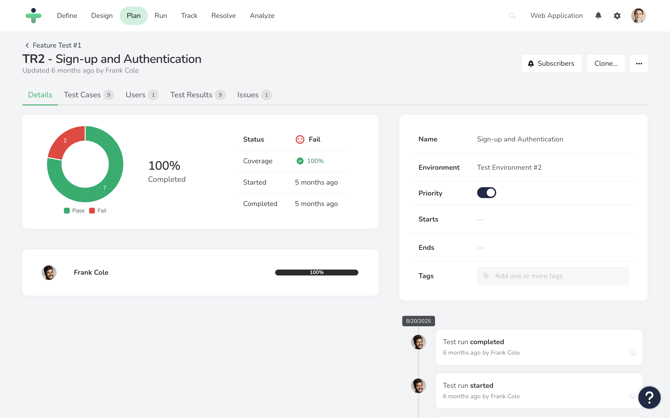
When you update a test run you have the option to assign tags as well.
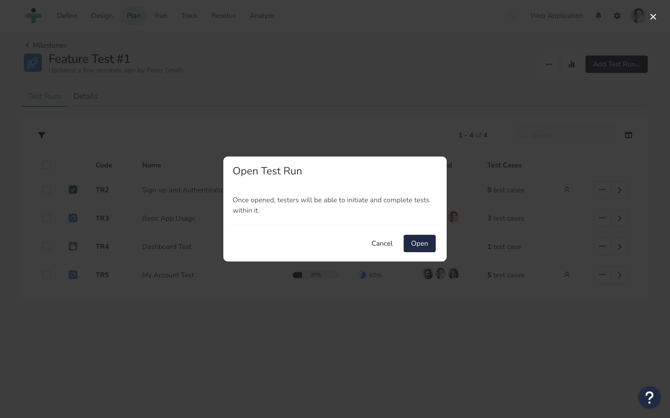
Open a Test Run
Once a draft test run is ready for active testing, you can mark it as "Open", allowing designated testers to execute the predefined test cases.
On the overview page:
- Click the three dots in the test run row and select Open.
- Click on Open to confirm opening this test run.
There are more options to open a test run:
- Click on the Open link in the information box that appears in the test run sidebar or test run detail page.
- Using Batch selection: select one or more test runs and click on the Mark as Open action.
Once opened, a test run cannot be set to Draft again.
Close a Test Run
By closing a test run, testing activities are brought to an end, preventing testers from further test execution and signifying the completion of a specific testing cycle.
On the overview page:
- Click the three dots in the test run row and select Close.
- Click on Close to confirm closing this test run.

You can also use batch selection to close multiple test runs at once. Select one or more test runs and click on the Mark as Close action.
You can re-open a test run after it's been closed by clicking the Open action in the three-dot test run row menu.
Clone a Test Run
Test runs can be easily reused by cloning them. Cloning a test run allows you to schedule previously completed tests within the same milestone. You can clone a test run from the overview page and from the detail page.
On the overview page:
- Click the three dots in the test run row and select Clone.
- A popup will give you the option to name the duplicate test run, set a new date range for the tests, select a test environment and set the test run priority. When you’re done, the newly cloned test run will appear in the bottom of the overview page.
On a test run detail page:
- Click Clone in the top right of the page.
- Fill out the resulting popup with the information for your new test run.
If you clone a milestone, then all of the test runs linked to the milestone will also be cloned.
Delete and Restore
To delete an individual test run:
- Click the three dots in the test run row and select Delete.
- Confirm you want to delete this test run by clicking Delete.
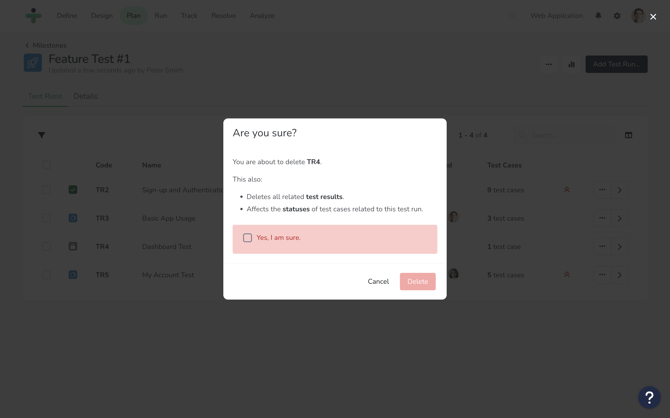
When a test run is deleted all related test results will be deleted.
If you deleted a test run by accident, you can easily restore the data:
- Click the three dots in the top right corner of the test run overview page, and then click on Restore test runs. A list of all trashed test runs displays.
- Locate the test run you want to restore and click the arrow button.
- Click Restore in the confirmation box and the restored test run now displays on the overview page again.
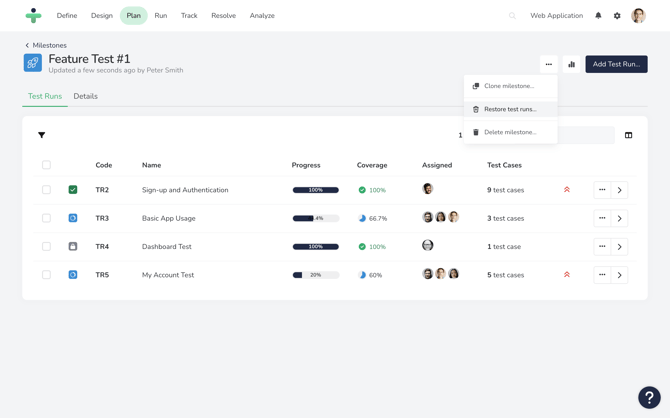
When a test run is restored, its test results will also be restored.
Batch Update Test Runs
Using multi-select, you can quickly update or delete several test runs at once:
- Use the check box next to the test run's code to select the run as part of your batch update.
- Select additional test runs, as needed. To select all, check the box in the table header.
- Click the selected button in the toolbar:
-
- When you select Update, a pop-up box displays. In this section you can edit a test run's tags, start and end date.
- There is also an option to batch update the end date of test runs using the Expire… options. You can update all of the selected test runs to end that week or the next week.
- There are options to batch add or remove a Priority notice from the test runs in the select menu as well.
- When you click Delete all the selected test runs will be deleted.