Keeping your project running smoothly is one of our priorities, that’s why TestMonitor makes it easy to import backups of your test case data. You can also use imports to easily migrate data from a third-party tool into the TestMonitor environment.
Before You Begin
Test cases require one or more test suites, make sure you've created a test suite before you proceed.
Preparing your Import File
You can import test cases from two different file types: CSV or Excel (file cannot exceed 5MB). Both file types will need certain importing fields and specifications that are detailed below:- Name: This field requires a value and has a 100 character maximum. Test case names must be unique within a test suite.
- Instructions: This is an optional field where you can add an instruction with basic rich text formatting.
- You can create multiple instructions for a test case, one row for every individual step. Each new row will need to have the name field filled out exactly the same in order for the system to recognize the instructions belong to the same test case.
- Preconditions: An optional rich formatting field for additional information on setting up a test case.
- Expected Result: An optional rich formatting field to detail the predicted outcome of the test case.
- Test Data: An optional field rich formatting for additional test case data.
- Duration: This is an optional field where you can enter the estimated time a test case will take to run. The field only allows rounded numerical values.
In all of the rich formatting fields, you can use HTML to markup the text with options such as bold, underline, italics and strikethrough. You can also update any of the text after the import by highlighting text and selecting advanced text formatting options in the popup menu.
You can add instruction lines to existing test cases with imports. Test cases are recognized by their Name. If you import a file with the same test case names, the system will recognize the test cases and append the new information from the import.
Here is an example of a CSV import file and you can also view our sample Excel file.
Not all of the fields available when creating a test case can be imported. The Code field is generated within the system and Tags, Requirements, Risks, and Applications cannot be imported, though they can be batch added to test cases with multi-select once a test case is created.
Running the Import Wizard
Upload File
- Click on Design in the navigation menu and select the Test Suite name that you want to add your test cases to.
- Click the three dots in the top right corner of the test suite page and choose Import…
- Drag and drop, or click to select your import file. Click Mapping in the bottom right to access the next step.
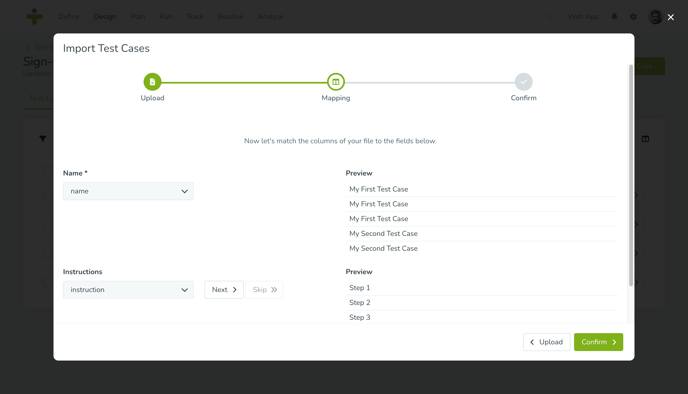
- Click the dropdown Map Column… and select the field from your file you want imported. Check if the preview shows the right data.
- Click Next to map the next column. If you don’t want to import an optional field, you can choose Skip. If you have defined any custom fields, they will be listed here as well. Continue to map every column from your import file.
- Choose Confirm in the bottom right when finished mapping all file columns.
- Click Finish in the bottom right to import all of the mapped file information.
- You will receive a notification alert and an email when your import has completed!
If there is an import problem, the email notification will contain details on the nature of the problem, including the row number.
Revert a Test Case Import
You can view previous test case imports on the Imports & Exports page. When viewing previous imports you also have the option to revert an import.
You can only revert a test case import if there are no requirements, risks or applications assigned and the test cases have not been planned in any test runs.
- Click the Settings icon in the top right navigation.
- Select Imports & Exports in the left menu.
- Click the Imports submenu (which is the default).
- Locate the import you wish to undo and click the Revert icon on the right.
As mentioned above if you upload a file with already existing test cases, TestMonitor will ‘update’ (just add additional instruction lines to) the existing test cases. An import that updated the test cases can not be reverted.