
The integration of Azure DevOps with TestMonitor streamlines project management by allowing teams to import work items as requirements, enabling effective test case design. Additionally, sending TestMonitor issues to Azure DevOps creates a feedback loop for quick issue resolution and enhances project transparency.
About Azure DevOps
Microsoft Azure DevOps is a comprehensive, cloud-based platform that offers end-to-end tools and services to streamline the software development lifecycle. It encompasses a wide range of capabilities, including version control, agile project management, continuous integration and delivery.
Features
Here's a list of features available for the DevOps integration:
- Send issues as work items to Azure DevOps
- Link existing work items to issues in TestMonitor
- Link existing work items to requirements in TestMonitor
- Synchronize work item status from Azure DevOps
- Import work items as requirements in TestMonitor
- Import work items as issues in TestMonitor
Two-way sync is only available when subscribed to a Professional or Enterprise plan.
Prerequisites
Before you can use this integration, make sure that you meet these requirements:
- You must either be a admin or have the project manager role in TestMonitor.
- You have an active Azure work or school account.
- This account has permissions for work items (create and update work items).
- An organization and project set up in Azure DevOps.
When all these requirements are met, you can proceed with connecting to Azure DevOps.
Connect to Azure DevOps
Go to the Project Settings of the project you wish to set up an integration with. Once you have opened the project settings page:
- Head over to the Integrations section and click on the Azure DevOps panel.
- In the top right corner, click on Connect. The connection wizard appears.
- Click on Authenticate. You'll be redirected to DevOps (if you're not signed in with your Azure account, now is the time to authenticate).
- Confirm the permissions TestMonitor requires by clicking Accept. You'll be redirected back to TestMonitor.
- When authentication is successful, click on Project in the connection wizard to proceed.
- Select your DevOps Organization and Project.
- Click on Finish to complete the connection wizard.
You're now ready set up one or more features this integration has to offer.
Import work items from Azure DevOps
Importing work items from Azure DevOps offers the versatility to create them as requirements or issues in TestMonitor. This streamlined process boosts productivity by removing the necessity for manual imports and exports, while also creating a seamless link between Azure DevOps and TestMonitor.
Import work items as requirements
Importing work items as requirements initiates your test project by seamlessly transferring them from DevOps into TestMonitor, enabling you to effectively create test cases and ensure alignment with your project objectives.
To enable this feature, first, make sure you're connected to DevOps. Then, follow these steps to configure the import feature:
- In the Requirements panel, click on Set up...
- Enable the Import requirements option in the first page of the wizard and proceed to the next step.
- Either enable Import DevOps types to automatically create custom requirement types for Azure DevOps types or select a Default type for imports. Click Confirm to proceed.
- Click Finish to activate the Import requirements feature.
When enabled, head over to your project's requirements to start importing issues:
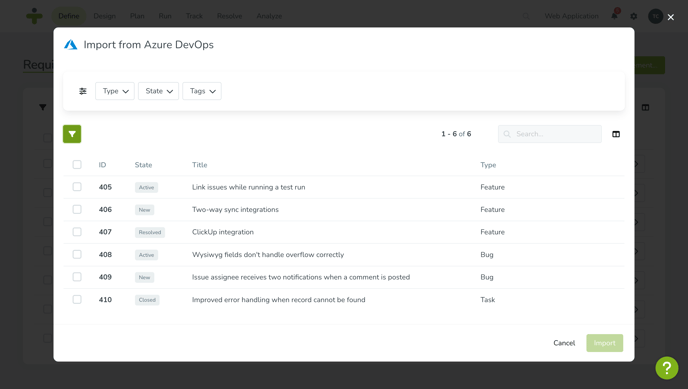
- In the top-right corner, click on Import from Azure DevOps. The DevOps work item browser will open.
- Select one or more work items by clicking on the checkboxes on the left side. You can use both the filters as well as the search feature to narrow down the list.
- Once you've selected the work items you want to import, click on Import to proceed.
TestMonitor will import the selected work items as requirements.
The name and description of the work item will be utilized when importing requirements. Please note that certain formatting options in the description may not be preserved due to variations in formatting support.
Import work items as issues
Efficiently copy the work items from DevOps to compile a comprehensive list of all your issues, readily accessible in TestMonitor. This allows you to create test cases and confirm their resolution with ease.
To enable this feature, first, make sure you're connected to DevOps. Then, follow these steps to configure the import feature:
- In the Issues panel:
- If you haven't configured the issues feature yet, click on Set up...
- When you've already configured the feature: click on Configure.
- Enable the Import issues option in the first page of the wizard and proceed to the next step.
- Enter your preferred options for the status and category fields by specifying the Default status and Default category.
- Proceed through the remaining steps until you reach the final step.
- Click Finish to activate the Import issues feature.
When enabled, head over to your project's issues to start importing issues:
- In the top-right corner, click on Import from Azure DevOps. The DevOps work item browser will open.
- Select one or more work items by clicking on the checkboxes on the left side. You can use both the filters as well as the search feature to narrow down the list.
- Once you've selected the work items you want to import, click on Import to proceed.
Send issues as work items to Azure DevOps
Sending issues as work items to DevOps from TestMonitor ensures swift resolution, while two-way status sync keeps TestMonitor updated, enabling you to retest and close any resolved TestMonitor issues or work items.
To enable this feature, first, make sure you're connected to DevOps. Then, follow these steps to configure the send issues feature:
- In the Issues panel:
- If you haven't configured the issues feature yet, click on Set up...
- When you've already configured the feature: click on Configure.
- Enable the Send issues option in the first page of the wizard.
- Proceed to the Send step and configure the options:
- Default work item type: This type will be used when creating a work item.
- Send by default: Enables the Send to Azure DevOps toggle as a default.
- Team: Optionally, you can pick a specific team for your work items.
- Proceed to the Synchronize step and configure two-way sync:
- Two-way sync: Enables two-way status sync between TestMonitor and Azure DevOps.
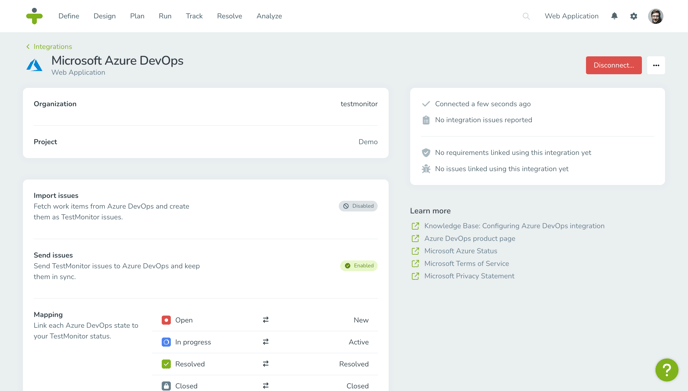
- Mapping: Align the work item states with the TestMonitor statuses. If you choose the "Don't assign" option, TestMonitor will ignore Azure DevOps updates to this status.
- Proceed to the Confirm step and click Finish to activate the Send issues feature.
You are now ready to send issues to Azure DevOps.
Two-way sync is only available when subscribed to a Professional or Enterprise plan.
Send new issues to Azure DevOps
Once the Send issues feature has been enabled, you can send new TestMonitor issues as work items directly to DevOps. Head over to your project's issue management and follow these instructions:
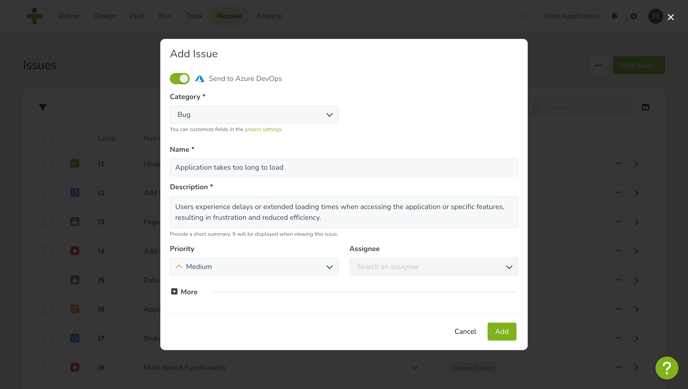
- Click the Add Issue... button.
- Fill in the issue's details.
- Enable the Send to Azure DevOps toggle.
- Click Create to confirm.
Once the process is complete, your issue will be created and sent to DevOps as a work item. Within the issue overview, a small DevOps badge will display the work item ID alongside the issue, serving as a direct link to the corresponding Azure DevOps page. Simply click on the badge to navigate directly to the Azure DevOps page for further details on the work item.
The work item's name will be aligned with TestMonitor, and the description will include the following details:
- Description (TestMonitor)
- Status
- Priority
- Category
- Assignee
- Custom fields (and their values)
Send existing issues to Azure DevOps
You can send issues already present in TestMonitor by following these instructions:
- Open the issue's detail page.
- In the top-right corner, click on the Azure DevOps logo. A dropdown menu will appear.
- Click on Send to Azure DevOps.
Once the procedure has been completed, your issue will be successfully sent to Azure DevOps as a work item and linked to the corresponding TestMonitor issue.
Link existing work items to TestMonitor issues
If you already have a work item that needs to be linked to its corresponding TestMonitor counterpart, follow these steps:
- Open the issue's detail page.
- In the top-right corner, click on the Azure DevOps logo. A dropdown menu will appear.
- Click on Link to Azure DevOps.
- In the dropdown field, select the work item you want to link.
- Click on Link to confirm.
Once the process is complete, your issue will be linked to Azure DevOps.
Unlink issues from Azure DevOps
If you have mistakenly linked the incorrect issue or simply wish to unlink the issue, you can follow these steps:
- Open the issue's detail page.
- In the top-right corner, click on the Azure DevOps logo. A dropdown menu will appear.
- Click on Unlink from Azure DevOps.
- Confirm your action by clicking Unlink.
Once the process is finished, the connection with Azure DevOps will be removed.
Disconnect the Azure DevOps Integration
If the integration is no longer required or your project comes to an end you can easily disconnect the integration.
To disconnect the integration, go to the Project Settings of the integration's project and follow these steps:
- Head over to the Integrations section and click on the Azure DevOps panel.
- In the top right corner, click on Disconnect....
- Click Disconnect to confirm.
By disconnecting the integration, all links between Azure DevOps and TestMonitor will be permanently removed. However, please note that the issues in TestMonitor and Azure DevOps will remain unaffected by this action.
Troubleshooting
If you encounter errors involving the Azure DevOps integration with TestMonitor, here are some steps you can take to troubleshoot the issue:
Inspect the integration log
The integration log assists in identifying the reasons for integration failures by listing all encountered issues while interacting with DevOps. To access the log, follow these instructions:
- Open the integration page
- Click on the link in the right panel that reports the number of integration issues.
Investigate the log entry by reviewing the error type and description. You can dismiss the error by clicking on the check button on the right.
Re-enable the integration
If an integration fails due to a communication error or glitch, re-enabling it on the integration page may resolve the issue. Test importing or sending a test object to ensure proper functionality.
Re-authenticate the integration
Your integration may have become disabled due to an authentication error. This could occur if the credentials used for authentication have expired or become invalid.
- Click on the three-dotted menu in the top-right corner.
- Select Re-authenticate...
- Confirm your action and provide your credentials when asked.
- Check if the problem persists by either importing or sending a test object.
Contact support
If these solutions do not resolve your issue, feel free to reach out to our support team for additional assistance.