Issues are defects that cause an incorrect or unexpected result making them critical to manage towards completing your project. The best issues have identified actionable problems that can be assigned to specific users with all the details needed to reproduce or clarify the issue.
By creating issues for your project, you are clearly identifying actionable problems for stakeholders to work on as well as a centralized place for conversation on that work to take place. Issue management allows you to track progress and attempted fixes to dynamically problem solve and update the issue as you go.
Before You Begin
Make sure your project has the issue feature enabled.
Issues Overview
The issues overview page provides a place to view and manage all of a project's issues in one place. Click Resolve in the navigation menu to access the overview page.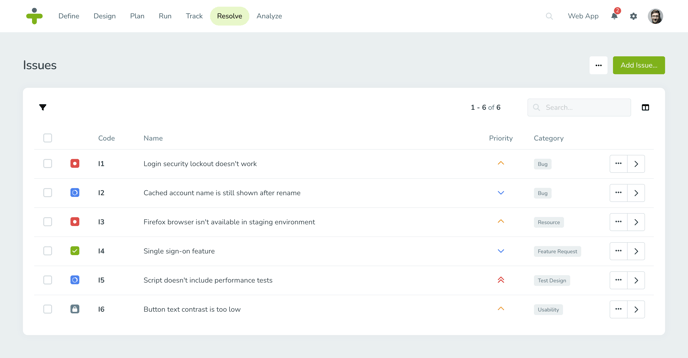
You can use filtering and column adjustments to see the issues most relevant to you on the overview page. Some helpful filters might be:
- Status: This allows you to view issues based on their current progress, such as open, in progress, or resolved.
- Assignee: This allows you to view the issues relevant to you and your team.
- Priority: This allows you to view issues based on what you should focus on first.
Make use of the option to save a filter in filter settings so that your custom view becomes the default. You can undo your filter view by using shortcuts.
Status of an Issue
Effective issue management is crucial for maintaining a streamlined development process. To help you track the progress of reported problems, TestMonitor provides the following built-in issue statuses, each with a specific purpose and meaning:
- Open: Issues that have been identified but have not yet been actively worked on.
- In Progress: Issues that have been assigned to a developer or team and are actively being worked on.
- Resolved: Issues that were previously open or in progress but have been fixed or addressed.
- Re-test: Issues that have been marked as resolved but require further testing to ensure the problem is truly fixed.
- Closed: Issues that have been verified, tested, and confirmed as resolved.
Each state is depicted by a status icon that will show up in each issue overview.
You can customize the status list and tailor it to your specific organization's needs. Using the customize lists option in the project settings, you can create additional status labels, hide the built-in ones and re-order the status list.
Add an Issue
If you want to create a new issue, click the green Add Issue button in the top right corner of the issue overview page. A popup will appear where you can fill out the various fields of the issue you are documenting.- Category: This is a required field where you can select the issue category. TestMonitor provides a default list including the categories ‘bugs’ and ‘feature requests’.
- Name: Choose something to the point that will summarize the issue you’ve identified. This is a required field with a max of 255 characters allowed.
- Description: This is a required field where you can clarify the issue and give more information about the steps that lead to the issue. This is an opportunity to describe the expected result versus the actual result of a test and explain how the test unfolded.
- Status: This is a required field where you can select the issue state. TestMonitor provides a default list including the statuses ‘open’, ‘resolved’, and ‘retest’.
- Priority: With this optional field you can select the importance of an issue. TestMonitor provides a default list with the options of ‘low’, ‘medium’, and ‘high’.
- Assignee: This is an optional field. Click the dropdown to see a list of all project members to choose from.

If you have defined custom fields for issues, they will show up here when the Show on Form option is enabled. You can manage your custom fields for issues in the Custom fields section in the project settings.
Below the Assignee field you have the option to click + More and fill out more optional fields on an issue:
- Affects: Click to select the application version in which an issue was found. For this dropdown to populate, you must first create versions for applications and make sure the applications feature is enabled.
- Resolution: With this optional field you can specify the reason an issue is closed. TestMonitor provides a default list with the options ‘fixed’, ‘duplicate’, and ‘won’t fix’.
- Tags: Click the dropdown to select tags for your issue. You can create new tags by typing the new label and hitting enter.
You can customize the lists for the Category, Status, Priority, and Resolution dropdowns. Issues can be complex and may require more information for your team to resolve them. TestMonitor provides a way to add custom fields to your issues so that you can keep track of all the data you need.
Issues can also be created at any point when running tests and analyzing test results. After creation they will be available on the issues overview page.
Update an Issue
You can update an issue in both the sidebar view of the issue and the detail page. In both views, you can update the basic fields of an issue.
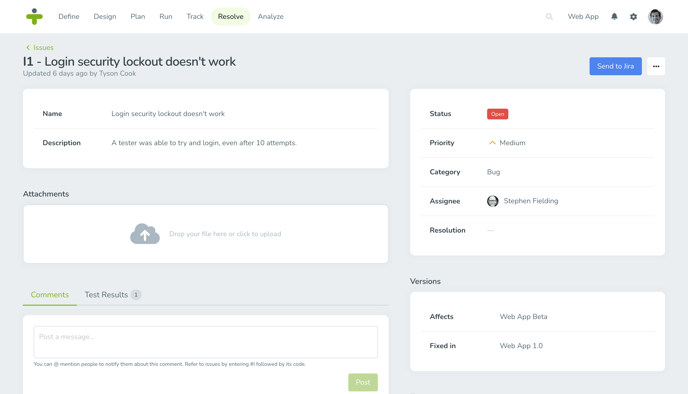
To see the sidebar view of an issue, click anywhere in the issue row and a panel with issue information will popup on the right. To see the detail page for an issue, click on the code or right arrow and a new page will open with the issue information. To update the information:
- Hover over a field and click the pencil edit icon.
- Click the save icon by each field to keep the changes made.
TestMonitor supports uploading files up to 50 MB in size.
When you update an issue you can also add extra attachments and the option to select the version an issue is fixed in. For the fixed versions, you must first create application versions and make sure the applications feature is enabled.
Comment on Issues
You can add comments on an issue to create a discussion between your team members and keep all the issue information centralized. You can use mentions to address comments to specific users and bring them into an issue discussion.

You can also refer to other issues by using the hashtag and entering the code or (part of) the name or description of the issue you want to refer to.
To view and add comments for an issue in the sidebar, open the Comments submenu.
To view and add comments for an issue in the details page, simply scroll down to the Comments submenu (which is the default selection).
Related Test Results
Issues can be related to test results, so that you can see the scenario and details around the discovery of an issue. To view and work with related test results, open the issue detail page and click the Test Results submenu. You can remove the link between an issue and a test result by clicking the remove icon in a test result row. To view the details page for a test result, click the right arrow in a test result row.
Creating and linking issues to test results can be done on the track page. You can also create issues when running a test.
Issue Tasks
Once you have identified issues there will likely be steps that have to be taken to further understand or fix the issue. In order to keep track of these TestMonitor offers the ability to create issue tasks. With issue tasks you can assign a user to take care of a task as well as set an end date for the task to be finished by to make sure tasks are completed. When tasks are made, they will appear on the issue detail page and on the sidebar.To add an issue task:
- In the issue detail page or sidebar, click the three dots in the corner and select Add Task.
- Fill out the fields:
- Description: Required field that contains the directions for the task that needs to be completed.
- Assignee: Click the dropdown to select the user that will be responsible for the task. This field is required.
- Due on: Click to select the date the task should be completed by.
You can update a task the same way as any other issue field, by hovering over the field on the detail page and clicking the pencil icon.
To complete a task, click the checkbox to the left of the task row. The task will be greyed out with the text crossed out when completed.
When a task is red, it means the task has expired and is past its due date without being completed.
If you created a task by accident, you can delete it by clicking the three dots in the right of the task row and selecting Delete.
The task report will give you an overview of all the tasks in a project.
Delete and Restore
Sometimes issues are made by mistake and should be removed from a project, other times issues are accidentally deleted and need to be restored to a project. TestMonitor makes it easy to both remove and recover issues.
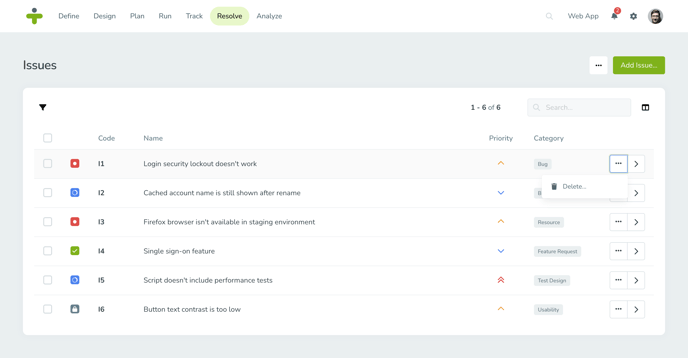
To delete an individual issue:
- Click the three dots in the issue row and select Delete.
- Choose Delete and confirm you want to delete the issue.
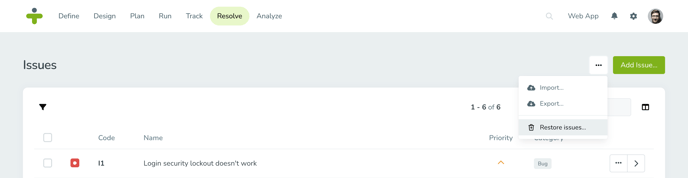
- Click the three dots in the top right corner of the issue overview page, and then click on Restore issues. A list of all trashed issues is displayed.
- Locate the issue you want to restore and click the arrow button.
- Click Restore in the confirmation box and the restored issue will now display on the overview page again.
When an issue is deleted, it will also be unassigned from all related test results. When you restore an issue, the link with the related test results will also be restored.
Batch Update Issues
If you want to edit or delete multiple issues, the fastest way is to use the multi-select:- Check the box that appears in front of the issue to select it as part of your update batch.
- Select additional issues, as required. To select all, check the box in the table header.
- Click the selected button in the toolbar:
- When you select Update, a pop-up box displays. This is where you choose to change one or more of the fields of all selected issues.
- There are other options to quickly batch update specific fields of an issue to a certain setting. You can assign issues to yourself, change their priority to high, and immediately update their status to either resolved or closed with these quick updates.
- When you click Delete all the selected issues will be deleted.