Once test runs are planned, testers can start testing. Each tester can see their assigned test runs on a personal overview page.
Testers execute the test runs that are assigned to them and can then provide their test results with reproducible test data and attachments. This allows testers to compare the expected results with the actual results of the test cases in the run. Accurately recording test results will allow a view of the project's progress and identify problem areas.
Before you begin
Testers can only run test runs that are assigned to them and that are active, so create test runs and assign them to the testers.
Assigned Test Runs Overview
Test runs are assigned to one or more testers. When a tester clicks Run in the navigation menu, they will see a list of all the active and planned test runs assigned to them. Test runs available to execute will have a start button. Test runs that are scheduled for a future date will instead have a calendar icon.
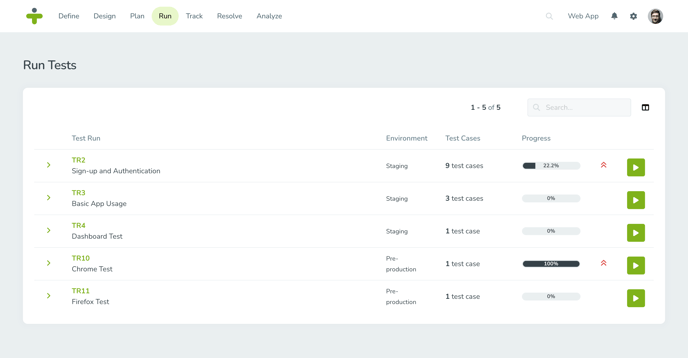
After a test run's end date, the run is considered expired and will no longer be visible to the tester. If a tester requires access to an expired test run a test manager will have to activate the test run again.
The overview page allows you to see at a glance what test environments a test run requires, progress made in the test run and the total estimated time the test run will take along with other helpful data. Clicking on a test run will display more information about the test cases assigned to that run.
On the project dashboard and My Work page is a panel My Test Runs that shows all the active test runs assigned to the logged in user. This allows the tester to quickly start a test run.
Add Test Results
When you are ready to run a test and record it’s results follow the steps below:
- Open the test runs overview page and click the start button on the desired test run.
- Follow the directions in the test case details on the left of the screen.
- Select the test result status that corresponds to your result:
- Pass: The test case matches the expected result. No further information is required to continue.
- Caution: The test case was completed (and therefore didn’t fail) but had some minor issues associated with it. Information in the description field is required in order to save the test result.
- Fail: The test case result did not match the expected result. Information in the description field and an attachment are required in order to save the test result.
- Blocked: The test case cannot run because the preconditions for its execution are not fulfilled. Information in the description field and an attachment are required in order to save the test result.
- Enter a Description of what happened with the test compared to what was expected to happen.
- Add any supporting attachments and screenshots by dragging and dropping files to the field or adding print screens from your clipboard.
TestMonitor supports uploading files up to 50 MB in size.
You can customize the test result statuses and validation rules. You can choose if a description or attachment is required for each status. You may also remove status options if you do not want all four of the default options.
The purpose of recording test results and having the fields above is to provide reproducible test results to troubleshoot and then retest. The more information added in the test result, the more success you will have moving your project forward.
After entering test results, a tester can move between the other test cases in a run by clicking the Previous or Next buttons at the bottom of the page.
You can also navigate between test cases by selecting them in the left side bar.
Create or Link Issues While Running Tests
Sometimes when a tester goes to run a test they realize there is an issue that needs to be solved or an issue is related to a failed test result. TestMonitor allows testers to easily log an issue or link an existing issue within the test run screen.
Click on the bug icon in the top right of the page. A dropdown menu will appear:- To create and link a new issue, select Add Issue. When you create an issue, the test result description will be copied into the issue's description field. Fill in the required fields and click Add to confirm.
- To link an existing issue, select Link to Issue. Select the related issue from the dropdown and click Link to confirm.
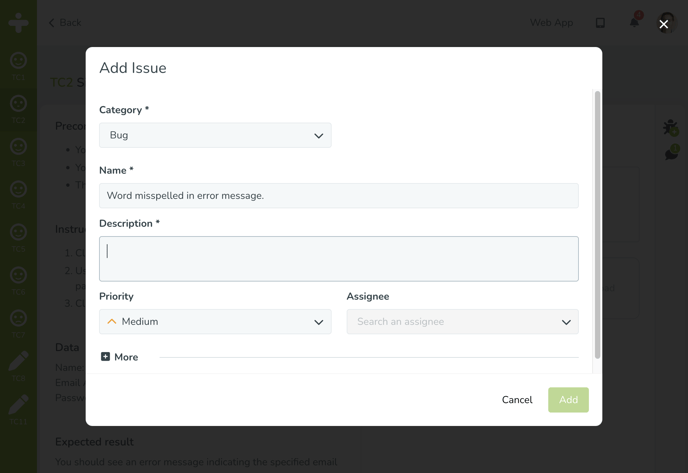
A result status must be selected before you can create an issue for a test case.
To view already reported issues, look for a yellow note that appears above the test case details. The note will contain the number of reported issues and clicking the issues will open the issues popup to view further information.
Comment on Test Results
TestMonitor provides a simple way for users to comment on and discuss a test result. Click the comment icon that looks like a speech bubble on the right of the test execution page to add a comment.
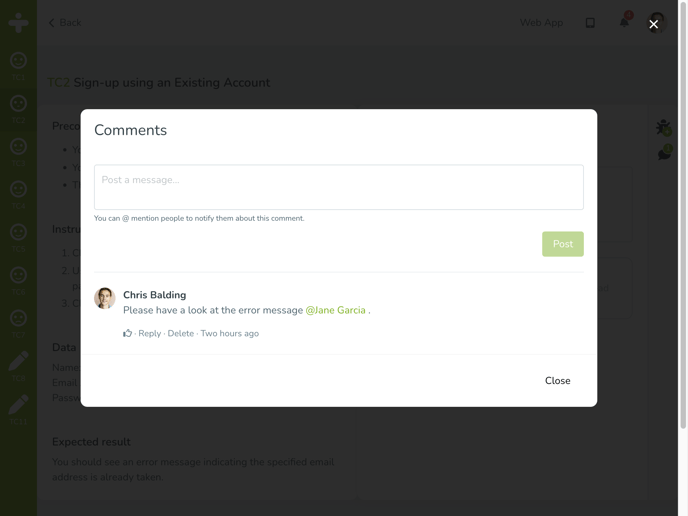
The comments popup will show all comments made about the test result and provides space to write and post a new comment. With text formatting and mentions users can specify a specific user they want to address a comment to so that the user gets a notification.
Test Run Progress
When in the process of executing a test run, a tester can see their progress in a test run in the left sidebar. A test case that is tested will show the result status icon. A test case that is in progress will have a pencil icon. If a test case has an empty circle, it means that there is no test result for that case yet and no work has been started on it.
When not actively executing a test run, each tester can view their progress on a test run by clicking Run in the navigation menu to see the overview page.
To see the progress for an entire test run, navigate to Track in the top menu. Here you can track the progress for all the testers for a test run looking at the Progress column.