Tracking test runs lets you see what test runs passed and failed and review the results in detail to understand why they had the results they did. With the test results overview page, you can quickly see the progress per test run and understand the progress of your project and adapt as necessary.
The additional features of comments, attachments, and issues make it so that the problems encountered during testing are easily communicated and can be turned into trackable outcomes for a team to work on and resolve.
Test Runs Overview
You can view all of a project’s test runs by clicking on Track in the navigation menu. An overview of every test run, its progress in testing, any recorded test results, the calculated outcomes, and linked issues will be visible on the overview page.
Remember to use filtering and column adjustments to see the results most relevant to you.
To see more details, click on the green arrow next to the test run code and the section below will expand with further details on the test results of all test cases in the test run.
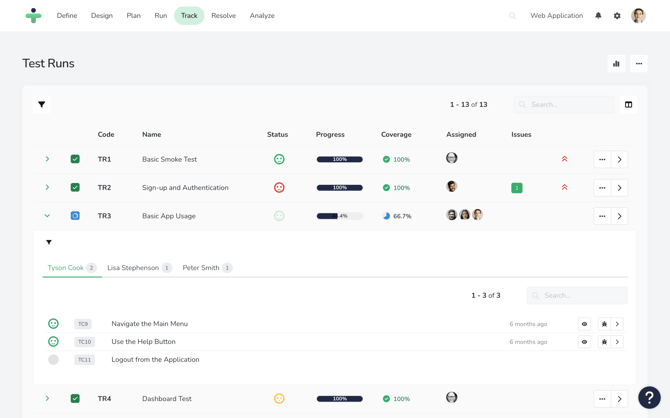
Once opened, the expanded row will display one or more tabs, representing the test results of each assigned user. Within a tab, each assigned test case will be shown, along with a test result. Test cases without a test result will be marked with a grey circle.
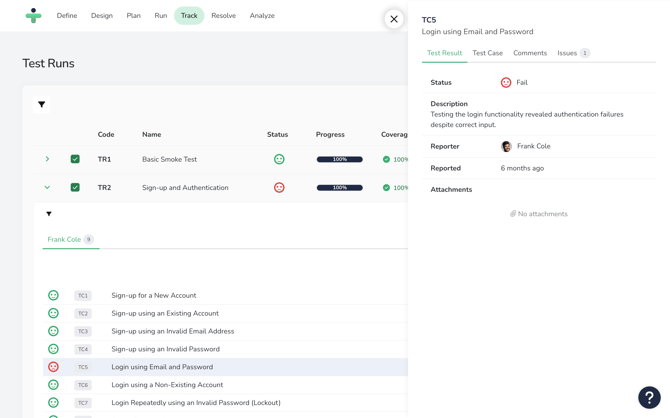
You can view the details of an individual test result by clicking on it. A sidebar will open, displaying the status and a description of the selected test result. From there, you can also review the related test case, any attachments, comments, and any linked issues.
The status displayed for a test run is based on the most severe test result within the test run. For example, if a test run consists of 10 test cases and 9 of those passed and 1 failed, the test run status will show as failed.
Test Run Details
To see more detailed information about a test run, or make any edits to it, first click Track in the navigation menu and then selecting Test Runs in the submenu (which is the default). Select the arrow to the right of the test run to open the detail page.
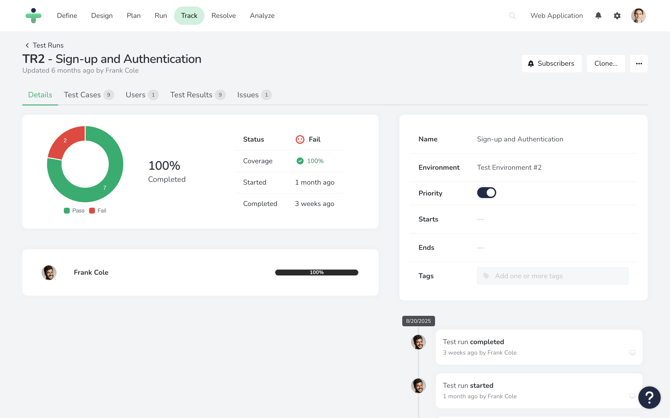
The detail page will give you an overview of the test results provided for the selected test run as well as the user who provided the results. You will also be able to see the progress made on the test run, broken down per user assigned, to help you keep your project on track. You are also able to create and link any issues relevant to the test results.
In the Test Runs submenu, you can also click the + icon to the left of any test result to show a dropdown with an overview of the test results and test case details. Click the arrow next to a test result to see further details for a single test result.
Managing Test Runs
Using the track test runs page you can easily manage and understand your project progress.
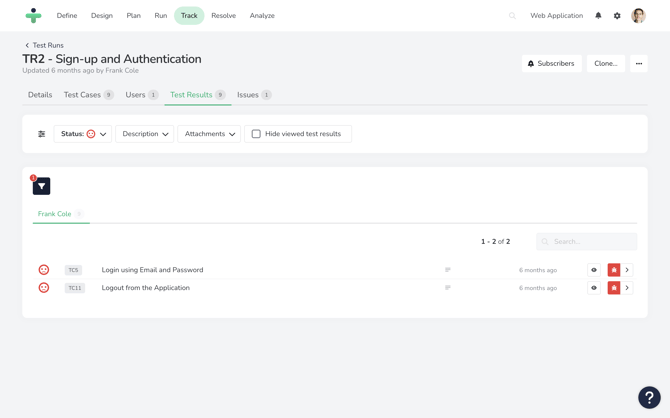
The eye icon in a test result’s details will mark a test result as “viewed.” Marking a test result as viewed will help you find results that have not yet been reviewed using filters later. Marking a test result as viewed means that there is no further action needed on it. When a tester updates test results, the result will automatically be marked as “not viewed,” making it easy to track.
TestMonitor has several features and criteria you can use to filter your results by, some of the most helpful are:
- Milestone: This allows you to view test runs based on the milestone you are currently tracking results for.
- Priority: This allows you to focus on test runs that have been identified as a higher priority to complete in a project.
- Completed: This lets you see all test runs completed versus not yet completed to manage your project.
Make use of the option to save a filter in filter settings so that your custom view becomes the default. You can undo your filter view by using shortcuts.
Rerun a Test Run
When managing your test results, you may realize you need to rerun a test. To rerun a test:
- Click the three dots to the right of a test run and select Rerun.
- A popup will come up where you can fill out the Name, Priority, and Start and End dates of the rerun.
All of the test cases and the same testers will automatically be assigned to the rerun.
Create and Link Issues
Often failed test results indicate new issues for a project. In TestMonitor you can create an issue from a test result, or even link a test result to another already existing issue. The test result with all its details will be linked to the issue and you can assign an issue directly to the person that should resolve it.
Linking an issue to a test result will also link it to any test run details. This means that in issue management and project reports you can later filter issues by their linked data such as a milestone.
When creating or linking an issue to a test result you will also have the option to copy attachments of the test results to the issue. If you toggle this option the attachments of the test result in question will be copied to the attachments field of the issue.
If you do not copy the attachments from a test result during issue creation, you can go into the Test Results tab in an issue sidebar or issue details page to review the attachments.
Linking issues to test results is a key component of issue management and helps keep your troubleshooting organized. In the test results overview you can see how many issues, based on their status, are linked to a test case in the column Issues. You can remove the link between a test result and issue from inside the issue detail page.
Comment on Results
Comments help to create a discussion around results. Users can add comments on the result detail page. Click the comment icon that looks like a speech bubble to add a comment.
The comments popup will show all comments made about the test result and provides space to write and post a new comment. With text formatting and mentions users can specify a specific user they want to address a comment to so that the user gets a notification about the comment. Comments will also be visible to testers when they go to execute a test and can help the tester with additional information.
Take advantage of comments to communicate with team members about their result. Users receive notifications that allow them to open up their test results and easily run an active test run again to further troubleshoot and collaborate on a problem.