Projects are the starting point for TestMonitor. A project contains all your data, like requirements, test runs, test results and issues. Using a project, you can clearly work towards a goal and show project stakeholders progress markers.
Often, separate projects are made for each real-life projects, software releases or features. To make this easy, there is no limit to the number of projects you can create in TestMonitor. We have even made it so you can easily clone a project and its data to reuse the design for similar projects. You can either complete or archive projects as they are finished to maintain their data for records and later reports, but clear user screens of redundant data.
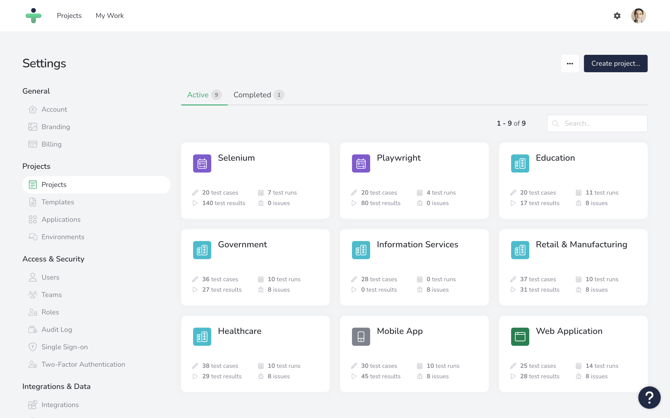
Projects Overview
The project overview provides a list of all the active projects in your TestMonitor environment. To access the overview, click the gear icon in the top menu to go to the settings, and select Projects in the left menu.
Add a Project
From the project overview page, you can create new projects for your TestMonitor environment. Click Create project and the project creation wizard will open. Fill in the information for the different wizard pages to create your new project.
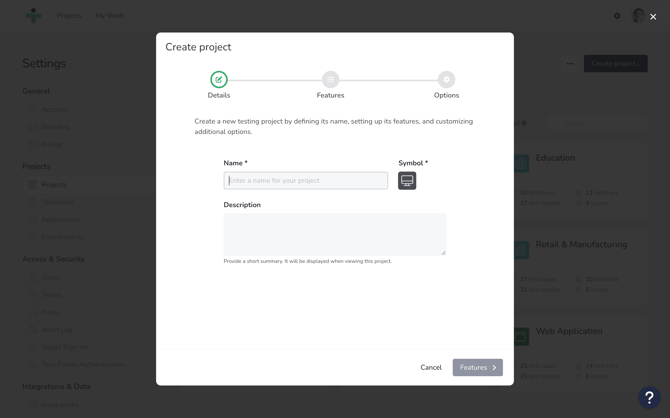
The details section is the first part of the project creation wizard and contains the following fields:
- Symbol: You can choose an icon for your project, which will be displayed on the dashboard, in the project overview and in the project selector.
- Name: This is a required field for the title of the new project.
- Description: This is an optional field where you can add more information.
- Starts: This is an optional field where you can select the start date of the project.
- Ends: This is an optional field where you can select the project end date.
Click Features when finished to move on to the next step.
Features
The features section lets you enable or disable features for your project. You can add or hide the requirements, risks, applications, and issues feature from your project. When you have finished, click Template to move on to the next step.
Template
If you want to use a template to add reusable content to your project, then toggle the Apply template switch and select a template from the dropdown. Once you click Create, your new project will be available immediately.
Update a Project
You can update a project at any time. From the project overview page, click the project to open the details page. Here you can update the project settings and customize your project. Hovering over a field reveals a pencil icon that allows you to update field information.
On the project detail page you can also apply a template or publish this project as a template.
Clone a Project
Sometimes you need to create a project that closely matches an existing project. Rather than manually entering all of the data again, you can clone an existing project to easily reuse and copy all the data you need.To clone a project:
- Open the project overview page and click the project to open the details page.
- Click the Clone button at the top of the page.
- A popup will open where you can fill out the following information:
- Contents: Check the boxes to determine what data you want to be copied for your new project, such as requirements, test cases and test runs.
- Name: Enter the title of the new project. This is a required field.
- Starts: Optionally, select the start date for the new project.
If you clone the milestones and test runs to your new project, the dates will be calculated based on the start date of your new project.
Complete a Project
When you have finished a project, you can mark it as complete to remove it from your active projects list.To mark a project complete:
- Open the project detail page.
- Toggle the switch to Completed.
You can view completed projects in the Completed Projects submenu on the project overview page. If you made a mistake, you can mark a project incomplete by simply switching the toggle on the project detail page.
Completed projects will not show in the project selector. The My Work view will stop listing assigned test runs, issues and tasks once a project is marked as complete. Also, TestMonitor will stop sending test run reminders and weekly summaries to Slack or Microsoft Teams.
Archive and Unarchive
If you are finished with a project and want to free up your overview page, you can archive it. The project will no longer appear in project lists and project members won't be able to access the project anymore. The project data will be saved for later reference.To archive a project:
- Find the project on the project overview page.
- Click the project to open the project details.
- Select the three dots in the top right corner and click Archive.
- Open the project overview page.
- Click the three dots in the top right corner and then click on Project Archive.
- Find the project you wish to unarchive and click the arrow.
Once you unarchive a project all project members will regain access to it.
Project Navigation
When you’re working in projects you can switch between the projects you are currently assigned to. Click the project selector in the top menu. In the dropdown you will see all of the projects that you are assigned to. You can click one of the projects to open it.
If you want to see all the projects in the environment, click the gear icon in the top menu and go to Projects. This brings you to the project overview page.